Migrate APIs and Applications to a Target Tenant Using the CLI Tool
WSO2 API Cloud allows you to export and import APIs and applications between tenants using a CLI tool. For example, if you have an API running in a particular tenant (e.g., [email protected]@testorgs), you can use the CLI tool to export the API and then import it to another tenant environment (e.g., [email protected]@testorg1). Therefore, you do not have to take the time to create APIs and applications from scratch when you want to have the same APIs and applications in a different tenant.
Understand the API import/export tool
The API import/export tool uses a RESTful API protected by basic authentication.
The export functionality
The API export functionality retrieves the information required for the requested API from the registry and databases and generates a ZIP file, which the exporter can download. This exported ZIP file has the following structure:
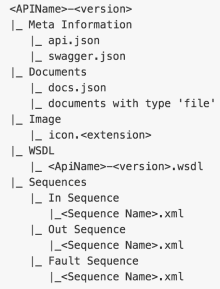
The structure of the ZIP file is described below:
| Sub directory/File | Description |
|---|---|
Meta Information |
|
Documents |
|
| Image | Thumbnail image of the API |
| WSDL | WSDL file of the API |
| Sequences | The sequences available for the API |
The import functionality
The import functionality uploads the exported ZIP file of the API to the target environment. It creates a new API with all the registry and database resources exported from the source environment. Note the following:
- The life cycle status of an imported API will always be
CREATEDeven when the original API in the source environment has a different state. This is to enable the importer to modify the API before publishing it. - Tiers and sequences are provider-specific. If an exported tier is not already available in the imported environment, that tier is not added to the new environment. However, if an exported sequence is not available in the imported environment, it is added.
- The importer can decide whether to keep the original provider’s name
or replace it. Set the
--preserve-providerflag to true to keep it. If you set it to false, the original provider is replaced by the user who is sending the CLI command. When working with the API cloud you need to set this flag to false, because exporting and importing happen between tenants in the API cloud. - Cross-tenant imports are not allowed by preserving the original
provider. For example, if an API is exported from tenant A and
imported to tenant B, the value of the
--preserve-providerflag must always befalse.
Get Started
Note
After running the CLI tool be sure to add an environment before you start working with the import/export CLI commands.This is necessary because all APIs and applications need to be imported or exported to a specific environment.
Run the CLI tool
-
Go to https://github.com/wso2/product-apim-tooling/releases/tag/v2.0.4.
-
Under the Assets section, click on a required installer depending on your operating system (i.e., MacOS, Linux, Windows). This downloads the appropriate CLI tool.
-
Once the download completes, extract the downloaded CLI tool to a preferred location and
cdinto it. -
Navigate to the working directory where the executable of the CLI tool resides.
-
Execute the following command to start the CLI tool.
./apimcli -
Add the location of the extracted folder to your system's
$PATHvariable to be able to access the executable from anywhere.Note
For further instructions execute the following command.
apimcli --help
Set global flags for CLI tool
The following are some global flags that you can use with the CLI tool.
--verbose
    Enable verbose logs (Provides more information on execution)
--insecure, -k
    Allow connections to SSL sites without certs
--help, -h
    Display information and example usage of a command
Add environment
You can add an environment by running the following CLI command.
Note
In API cloud importing and exporting of APIs and Applications take place between tenants as opposed to environments. Therefore, you need to only add one environment in the CLI tool. This environment will be used between tenants to call the endpoints of the API cloud.
apimcli add-env- Make sure that the CLI import/export tool is running.
-
Run the following CLI command in the specified format depending on your operating system:
-
Command format on Linux should be as follows:
apimcli add-env -n <environment-name> \
                --registration <registration-endpoint> \
                --apim <API-Manager-endpoint> \
                --token <token-endpoint> \
                --import-export <endpoint-for-environment> \
                --admin <admin-REST-API-endpoint> \
                --api_list <API-listing-REST-API-endpoint> \
                --app_list <application-listing-REST-API-endpoint>
The flags you can set are as follows:
Required flags:
--name, -n: As we only need one environment when working with the API cloud, name the environment as wso2apicloudThere are no short flags for the following flags: -
--registration-
--apim -
--token -
--import-export -
--admin -
--api_list -
--app_list
Example
apimcli add-env -n wso2apicloud \
                      --registration https://gateway.api.cloud.wso2.com/client-registration/register \
                      --apim https://gateway.api.cloud.wso2.com/pulisher \
                      --token https://gateway.api.cloud.wso2.com/token \
                      --import-export https://gateway.api.cloud.wso2.com/api-import-export \
                      --admin https://gateway.api.cloud.wso2.com/api/am/admin/ \
                      --api_list https://gateway.api.cloud.wso2.com/api/am/publisher/apis \
                      --app_list https://gateway.api.cloud.wso2.com/api/am/store/applications
Response Format:
Successfully added environment '<environment-name>'Example Response:
Successfully added environment 'wso2apicloud'
-
-
Command format on Mac OS should be as follows:
apimcli add-env -n <environment-name> --registration <registration-endpoint> --apim <API-Manager-endpoint> --token <token-endpoint> --import-export <endpoint-for-environment> --admin <admin-REST-API-endpoint> --api_list <API-listing-REST-API-endpoint> --app_list <application-listing-REST-API-endpoint>The flags you can set are as follows:
Required flags:
--name, -n: As we only need one environment when working with the API cloud, name the environment as wso2apicloud.There are no short flags for the following flags: -
--registration-
--apim -
--token -
--import-export -
--admin -
--api_list -
--app_list
Example
apimcli add-env -n wso2apicloud --registration https://gateway.api.cloud.wso2.com/client-registration/register --apim https://gateway.api.cloud.wso2.com/pulisher --token https://gateway.api.cloud.wso2.com/token --import-export https://gateway.api.cloud.wso2.com/api-import-export --admin https://gateway.api.cloud.wso2.com/api/am/admin/ --api_list https://gateway.api.cloud.wso2.com/api/am/publisher/apis --app_list https://gateway.api.cloud.wso2.com/api/am/store/applicationsResponse Format:
Successfully added environment '<environment-name>'Example Response:
Successfully added environment 'wso2apicloud' -
Troubleshooting
Why do I get the following error?
You get the above error if you have worked with two CLI tools. Carry out the following steps if you get the above error:[ERROR]: parsing /Users/<user-profile-name>/.wso2apimcli/env_keys_all.yaml panic: runtime error: invalid memory address or nil pointer dereference [signal SIGSEGV: segmentation violation code=0x1 addr=0x0 pc=0x1343b82]-
View the
env_keys_all.yamlfile and check if there are any NULL values. -
Delete the
env_keys_all.yamlfile. -
Execute the command that you initially executed.
For example if you got this error when trying to add an environment, then follow the steps mentioned under Adding an environment to reattempt to add the environment .
-
List environments
- Make sure that the CLI import/export tool is running.
-
Run the following CLI command to list the environments.
There are no flags for the following CLI command:-
Command:
apimcli list envs -
Response:
Environments available in file '/Users/kim/.wso2apimcli/main_config.yaml'
NAME PUBLISHER ENDPOINT REGISTRATION ENDPOINT TOKEN ENDPOINT wso2apicloud
https://gateway.api.cloud.wso2.com/pulisher
https://gateway.api.cloud.wso2.com/client-registration/register
https://gateway.api.cloud.wso2.com/token
-
Migrate APIs to a target tenant
Export an API
- Make sure that the CLI import/export tool is running.
-
Run the following CLI command to export an existing API as a
.ziparchive.-
Command:
apimcli export-api -n <API-name> -v <version> -r <provider> -e <environment> -u <username> -p <password> -kapimcli export-api --name <API-name> --version <version> --provider <provider> --environment <environment> --username <username> --password <password> --insecureFlags:
- Required flags:
--name, -n--version, -v--provider, -r: The provider should be as follows:<username>@<organization-key>
For example,[email protected]@testorgs--environment, -e: The name of the environment that you created in the API cloud, which is as follows: wso2apicloud. `--insecure, -k: This allows connections to SSL sites without certificates.
-
Example:
apimcli export-api -n PhoneVerification -v 1.0.0 -r [email protected]@testorgs -e wso2apicloud -k -
Response:
Successfully exported API!
Find the exported API at /Users/kim/.wso2apimcli/exported/apis/wso2apicloud/PhoneVerification_1.0.0.zip
-
Import an API
Note
When you import an API, regardless the status of the imported API it will be added with the created state and you need to sign in to the Publisher and publish the API.
You can use the archive created in the previous section to import APIs to an API Manager instance.
-
Make sure that the CLI import/export tool is running.
Note
If you have enabled secure endpoints when creating the API and your username or/and password differs in the two environments, please follow the steps below before importing the API.
1. Unzip the .zip archive created in the previous section.
2. Go to the
<API-name-version>/Meta-informationdirectory and open theapi.jsonfile.
For example,PhoneVerification_1.0.0/Meta-informationdirectory and open theapi.jsonfile.3. Modify the
endpointUTPasswordwith your endpoint password and save theapi.jsonfile.4. Compress the
PhoneVerification_1.0.0folder to a folder namedmyExportedAPI. ` -
Run the following CLI command and when prompted for credentials enter your user name and password to import an API.
-
Command:
apimcli import-api -f <environment>/<file> -e <environment> -u <username> -p <password> --preserve-provider <preserve_provider> -kapimcli import-api --file <environment>/<file> --environment <environment> --username <username> --password <password> --preserve-provider <preserve_provider> --insecureFlags:
- Required flags:
--file, -f: The file path of the exported API. For example, if your file path is /Users/kim/.wso2apimcli/exported/apis/wso2apicloud/PhoneVerification_1.0.0.zip., then you need to enterwso2apicloud/PhoneVerification_1.0.0.zipas the value for this flag.--environment, -e: The name of the environment that you created in the API cloud, which is as follows: wso2apicloud.--insecure, -k: This allows connections to SSL sites without certificates.--preserve-provider: The importer can decide whether to keep the original provider’s name or replace it. When working with the API cloud, you need to set this value to false because you need to import the API from a different tenant and replace the original tenant's details.
- Required flags:
-
Example:
apimcli import-api -f wso2apicloud/PhoneVerification_1.0.0.zip -e wso2apicloud --preserve-provider=false -k -
Response:
ZipFilePath is /Users/kim/.wso2apimcli/exported/apis/wso2apicloud/PhoneVerification_1.0.0.zip
Successfully imported API wso2apicloud/PhoneVerification_1.0.0.zip
-
List APIs
Note
If you happen to list APIs that belong to a particular tenant (e.g.,
[email protected]@testorg1) and then you want to list
APIs that belong to aother tenant (e.g.,
[email protected]@testorgs), be sure to first reset the
user before listing APIs again.
- Make sure that the CLI import/export tool is running.
-
Run the following CLI command to list the APIs.
Tip
You need to specify the user name as
username@organization-key. For example,[email protected]@testorgs.-
Command:
apimcli list apis -e <environment> -kapimcli list apis --environment <environment> --insecureFlags:
- Required flags:
--environment, -e: The name of the environment that you created in the API cloud, which is as follows: wso2apicloud.--insecure, -k
- Required flags:
-
Example:
apimcli list apis -e wso2apicloud -k -
Response:
Environment: wso2apicloud
No. of APIs: 2
+-------------------+---------+-------------------------+-----------+-----------------------+--------------------------------------+
|       NAME        | VERSION |         CONTEXT         |  STATUS   |    PROVIDER           |                  ID                  |
+-------------------+---------+-------------------------+-----------+-----------------------+--------------------------------------+
| PhoneVerification | 1.0.0   | /t/testorg1/phoneverify | CREATED   | [email protected]@testorg1 | e72e2291-d135-4a1c-ba03-9278ede71075 |
| WorldBank         | 1.0.0   | /t/testorg1/wb          | PUBLISHED | [email protected]@testorg1 | b89a62a7-c27a-4fcc-9d24-0db0ee63d289 |
+-------------------+---------+-------------------------+-----------+-----------------------+--------------------------------------+
-
Migrate applications to a target tenant
Export an application
You can export applications from the Devportal and download them as a zipped file.
- Make sure that the CLI import/export tool is running.
-
Run the following CLI command to export an existing application as a
.ziparchive.Tip
You need to specify the user name as
username@organization-key. For example,[email protected]@testorgs.-
Command:
apimcli export-app -n <application-name> -o <owner> -e <environment> -kapimcli export-app --name <application-name> --owner <owner> --environment <environment> --insecureFlags:
- Required flags:
--name, -n--owner, -o: The owner should be as follows:<username>@<organization-key>
For example,[email protected]@testorgs--environment, -e: The name of the environment that you created in the API cloud, which is as follows: wso2apicloud.--insecure, -k: This allows connections to SSL sites without certificates.
- Required flags:
-
Example:
apimcli export-app -n TestApp -o [email protected]@testorg1 -e wso2apicloud -k -
Response:
ZipFilePath is /Users/kim/.wso2apimcli/exported/apis/wso2apicloud/PhoneVerification_1.0.0.zip
Successfully imported API wso2apicloud/PhoneVerification_1.0.0.zip
-
Import an application
Note
If you have been executing previous commands specifying credentials of a particular tenant and now you want to run the import application CLI command for another tenant, then you need to first reset the user before running the import an application command.
You can import an application to a target tenant as a zipped application. When you import an application as a zipped file, a new application is created within the target tenant.
- Make sure that the CLI import/export tool is running.
-
Run the following CLI command to import an existing ap plicatio n as a
.ziparchive.-
Command:
apimcli import-app -f <environment>/<file> -e <environment> -s <skip_subscriptions> -o <owner> -r <preserve_owner> -kapimcli import-app --file <environment>/<file> --environment <environment> --skipSubscriptions <skip_subscriptions> --owner <owner> --preserveOwner <preserve_owner> --insecureFlags:
- Required flags:
--file, -f: The file path of the exported App. For example, if your file path is /Users/kim/.wso2apimcli/exported/apps/wso2apicloud/[email protected]@testorg1_TestApp.zip., then you need to enterwso2apicloud/PhoneVerification_1.0.0.zipas the value for this flag.--environment, -e: The name of the environment that you created in the API cloud, which is as follows: wso2apicloud.--insecure, -k: This allows connections to SSL sites without certificates.--skipSubscriptions, -s
You can opt to skip importing the subscriptions of the application by defining this flag. This parameter is set to false by default.--owner, -oThe owner of the imported application can be specified by providing an username of a valid user based on your preference. The application importer can set the preferred owner’s username as the value of the--owneror-oflag.--preserveOwner, -r
You can also import the application by preserving the application owner information, based on the previous tenant. The application importer can add the--preserveOwneror-rflag in order to define that this flag is set to true. This parameter is set to false by default. Therefore, the default value is used when you do not define this flag. If you import the application without specifying any of the optional flags, you will be added as the owner of the application in the imported environment. If both the--ownerand the--preserveOwnerflags are set, then the--ownerflag gets higher priority over the--preserveOwnerflag.
- Required flags:
-
Example:
apimcli import-app -f wso2apicloud/[email protected]@testorg1_TestApp.zip -e wso2apicloud -o [email protected]@testorgs --preserveOwner --skipSubscriptions -u [email protected]@testorgs -p admin123# -k -
Response:
ZipFilePath is /Users/kim/.wso2apimcli/exported/apps/wso2apicloud/[email protected]@testorg1_TestApp.zip
Completed importing the Application wso2apicloud/[email protected]@testorg1_TestApp..zip
Succesfully imported Application!
-
List apps
- Make sure that the CLI import/export tool is running.
-
Run the following CLI command to list the apps.
Tip
You need to specify the user name as
username@organization-key. For example,[email protected]@testorgs.-
Command:
apimcli list apps -e <environment> -o <owner> -kapimcli list apps --environment <environment> --owner <owner> --insecureFlags:
- Required flags:
--environment, -e: The name of the environment that you created in the API cloud, which is as follows: wso2apicloud.--owner, -o--insecure, -k: This allows connections to SSL sites without certificates.
- Required flags:
-
Example:
apimcli list apps -e wso2apicloud -o admin -k -
Response:
Environment: wso2apicloud
No. of Applicationss: 2
+--------------------------------------+--------------------+-------+---------+----------+
|       ID                             |        NAME        | OWNER |  STATUS | GROUP-ID |
+--------------------------------------+--------------------+-------+---------+----------+
| e13b5bcf-dee5-48fe-9f23-bf46fc17a378 | DefaultApplication |       | APPROVED |          |
| 153ad3d3-fa26-4dda-af54-27eee3327848 | TestApp.           |       | APPROVED |          |
+--------------------------------------+--------------------+-------+---------+----------+
-
Reset user
If you want to list APIs or applications that belong to a particular tenant, you need to first reset the user before listing APIs or applications for the particular tenant.
- Make sure that the CLI import/export tool is running.
-
Run the following CLI command to reset user details.
-
Command:
apimcli reset-user -e <environment>apimcli reset-user --environment <environment>Flags:
- Required flags:
--environment, -e: The name of the environment that you created in the API cloud, which is as follows: wso2apicloud.
- Required flags:
-
Example:
apimcli reset-user -e wso2apicloud -
Response:
Successfully cleared user data for environment: wso2apicloud
-
Check the version of the CLI
- Make sure that the CLI import/export tool is running.
-
Run the following CLI command to check the version of the CLI.
-
Command:
Tip
There are no flags to set for the following CLI commands:
apimcli version -
Example:
apimcli Version: 1.1.0
-
Set HTTP request timeout
- Make sure that the CLI import/export tool is running.
-
Run the following CLI command to set the HTTP request timeout.
-
Command:
apimcli set --http-request-timeout <http-request-timeout>Flags:
- Required flags:
- `--http-request-timeout
- Required flags:
-
Example:
apimcli set --http-request-timeout 10000
-
Set export directory
- Make sure that the CLI import/export tool is running.
-
Run the following CLI command to the change the default location of the export directory.
-
Command:
apimcli set --export-directory <export-directory-path> -
Example:
apimcli set --export-directory /Users/kim/Downloads/MyExports
-